After a certain period, your device may start showing Impacts of power loss. But in case the hardware is running well, then the problem maybe is from micro damage and inner part fluctuations.
And the easiest and most effective way of getting rid of these issues is Resetting.
The same for each of the smart devices along with your Shark Vacuum. You will be wondering, after days, why the vacuum is being downgraded even when the hardware has no issue at all.
This is the situation you need to refresh the whole machine with a manual reset.
So, we will be digging “The steps to Reset Shark Vacuum Motor” here. Let’s get started.
Shark Vacuum Motor Reset
Tools To perform a reset operation
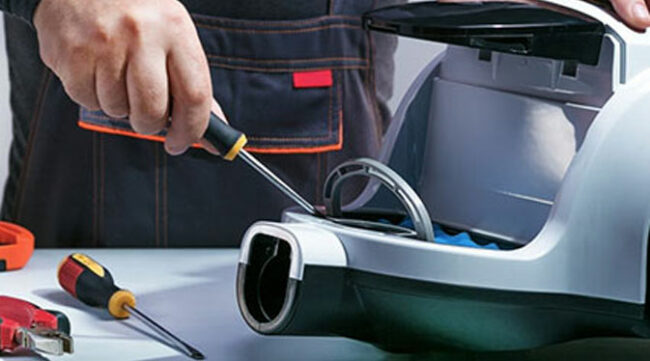
You are starting with the necessary tools because you cannot open the device bare-handed.
Screwdriver
You cannot approach the disassembling procedure of your shark vacuum without a screwdriver. This will be needed to loosen and tighten the screws on the back of the motor.
Metal Spudger
This is a wide tool with a flat head. It will be needed while opening the back chamber.
Plastic Opener
You will be needed to open the back panel of your shark vacuum.
Steps to Shark Vacuum Motor Reset
First thing first, before you reset the motor specifically, Do reset the Vacuum. That can make your actions more effective. Whatever, to reset your shark vacuum,
Find the power button and press it. Hold it for 10 seconds until the device turns off.
Then turn it back on again, and your device is done resetting.
Now go through the motor reset steps we are dropping below,
Step 1 – Separation
Unplug the vacuum first and turn the power off. Disconnect the hose pipe from the body, which is attached to the bottom. And then lay the vacuum on the side.
You can now locate a rubberish button underneath the vacuum. Press that button to separate it from the vacuum’s head.
Be cautious while pulling the hose pipe from the casing because you may need to give a bit extra force.
Step 2 – Prying Up
After detaching it from the body, flip it. Make the brush heads face to the ceiling. And then, put the metal spudger in the front area of the wheel and pry up until you can see those wheel screws.
Do it repeatedly for the other parts too.
Here keep trying with very gentle pressure because in case you give some extra pressure on the threads, it may turn into some permanent damage to your device. So, be cautious about it.
Step 3 – Unscrewing
Make sure you have completed the previous step properly, and then straight use the screwdriver and remove the 18mm screws.
You can find four more screws of the same size in the middle part, the bottom of the vacuum head, and in the top corners as well. You have to unscrew them all with your screwdriver.
Do not apply extreme pressure over the screws or any angled pressures. This may damage the threads permanently.
Step 4 – Case Detachment
You will find two more screws inside the large wheels. Use the screwdriver as usual to remove the screws.
These screws keep the plastic case attached. So, once you are done unscrewing, the case will come out.
Keep in mind that if you haven’t removed all the screws properly you won’t be able to detach the case.
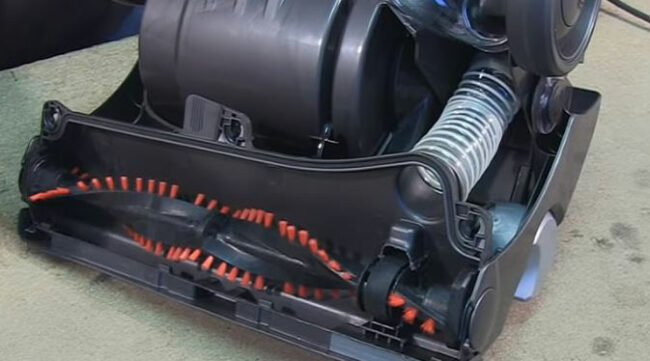
Step 5 – Motor Exposing
With the plastic tool, pry up the plastic case and make it detached. It is needed to pry in several locations for easy pressure points.
After you have removed that, you can easily see the motor, which is on the left side of the headshell.
Step 6 – Cables and Belts
Firstly, remove the belt of the motor. All you need to do is slide it to the right unless it is out after removing the belt and disconnect the metal wire connectors (Both the white and black ones).
In case you want to know the functionalities of the white and black wire connectors, then they represent positive and negative cables, respectively.
Step 7 – Reinstalling
You are at the end. After you have gone through the previous steps properly, you can remove the motor now.
Then reinstall the motor in the reverse process. Start from the sixth and end at first.
This is the whole procedure of how you can reset the Shark Vacuum Motor. This may save you from so many unwanted micro hardware troubles.
But still, if you have a question, why do you need to do it? Let’s explain.
Why Reset Shark Vacuum Motor and Thermostat
The answer is “For Refreshed Performance,” As we mentioned at the top of the article. Your shark vacuum is constructed with a large number of micro parts.
These integrated parts work together to give you a satisfying performance.
But after a longer period of use, the parts, especially the motor and the thermostat, start fluctuating their performance.
A manual resetting means proper disassembling and assembling of the whole device or any specific part, like we mentioned here, the Motor and Thermostat.
Though this won’t give you a massive boost up or new-like performance, it can pull the performance up a little bit. So, to make your shark vacuum bug free and for having a stable experience, your vacuum should get a proper reset.
Reset Shark Vacuum Motor Thermostat
Here are 5 simple steps for you:
- Turn off the device with the power button.
- Unplug your vacuum.
- Have a deeper check if there is any clogged-up dust in the hose filter. If yes, then clean it up properly. Sometimes cleaning up the clogs are quite impossible. In these sorts of situations, replacing the filter is highly recommended.
- Let your shark vacuum become cool. Wait for a minimum of 45 minutes.
- Plug the device in and turn the power on.
Too many users complain about their motor overheating or stopping suddenly. Several times the issue is actually from the motor and thermostat. They get malfunction and create some unstable problems.
The weird thing is that there is no written solution to this issue. You need to figure out the problem and take steps accordingly.
Resetting your Shark Vacuum Motor and thermostat or navigator motor is the native procedure of these steps.
Some still have a question, “Is there a reset button for the motor?”
The answer is “No”; there is no Motor Reset Button. You only have a device reset button which we already mentioned above, but no specific button for your motor or thermostat resetting.
Shark Ion 725, 750 suction motor troubleshooting
We won’t pull any conclusions because you already know what to do and how to perform it all about “Shark Vacuum Motor Reset.”
Related Articles:

Hi, This is George. Founder Of Vacuumist.com. Completed my graduation in Bachelor of Business Administration. Proud father of two lovely baby girls. Reviewing home appliances is my passion. Developing this blog to update and publish my recent reviews and research. Stay in touch.