Whether you’re a full-time job holder or a homemaker with a bunch of kids at home, cleaning the indoors can be a frantic task.
Especially ensuring your room’s nooks and corners are dust-free to avoid the allergy you have been suffering from.
And believe it or not, this extra cautious action of frequent dusting might lead to constant back pain.
Quite a dilemma; you wanted to suppress your allergy, and now you are a victim of back pain.
In such scenarios, technology can be quite the perfect helping hand to assist in household chores. Vacuum cleaners are a blessing from the modern tech that leaves our home or workplace squeaky clean with minimal effort.
One such product is the Kenmore Vacuum model 116, which has an easy-to-clean feature and comes in an affordable price tag.
In case you already own one of these and looking for suggestions on how to disassemble it for storing or transportation purposes, you’re at the right place!
So let’s move on straight away to the techniques of taking apart the pieces of this Kenmore model 116.
Troubleshooting: How to take apart a Kenmore vacuum model 116
Before we start off with our disassembly, it’s necessary to know that we need to take apart 3 parts of the Kenmore manual vacuum cleaner.
This includes the power-mate wand, the wheeled canister, and the plastic suction hose.
Step 1 of 4
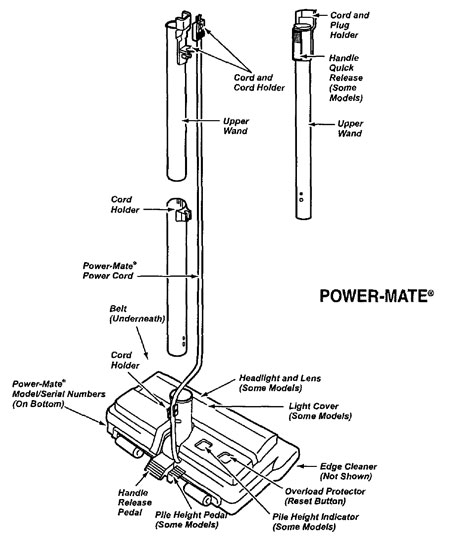
The first and foremost thing to do is to press all the release buttons, starting from the top to the base of the wand.
Once you’ve pressed the buttons, you must work your way through the wand by twisting and pulling each part.
This will result in 3 discrete sections of the wand- the upper wand, the middle section, and the footplate.
After this is done, put these pieces away in a safer place to move on to the next stage.
Step 2 of 4
The next step is to locate the plastic socket. You will see that it is situated just at the convergence point of the canister and the hose.
Gently pinch the socket latch and pull out the plastic hose from the entire canister hood.
To prevent the hose from tangling, make sure to tie it up with a rope or string. This will allow for a better storage facility.
Step 3 of 4
Moving on, your follow-up action is to press another latch located at the top of the Kenmore canister handle.
This will help you with the hood release that covers the Kenmore vacuum canister.
Once you put the hood cover wide open, take out the vacuum bag, which functions as a dust box.
Consecutively, discard the bag and be certain to carefully close the lid and that the latch is locked again.
Step 4 of 4
The last step for disassembly is to wrap up the excess cord for easier later use. Hold down the cord storage button, which will automatically do the job for you!
Afterward, collect all the parts and store them safely away from children’s reach.
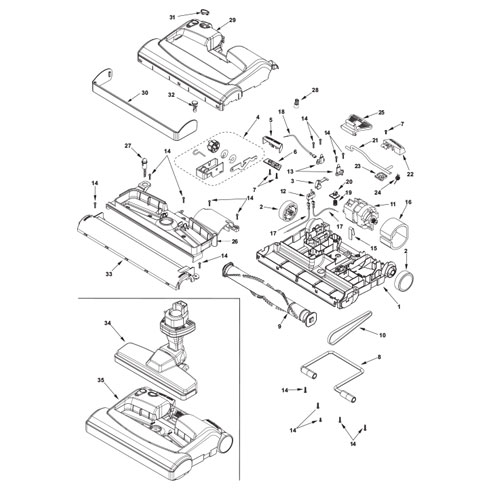
Supposedly, if you’re looking to repair or replace any parts, such as the drive belt, foot pedal, or brush roller, you’ll need to go for further disassembly by taking out the visible screws one by one.
Unless you’re keen on going to the nearest repair center, we have you covered!
So, let’s continue to some of the most common troubleshooting problems and solutions you may need for the Kenmore 116 Vacuum.
Want to download or check the Kenmore model 116 vacuum manual? Check here.
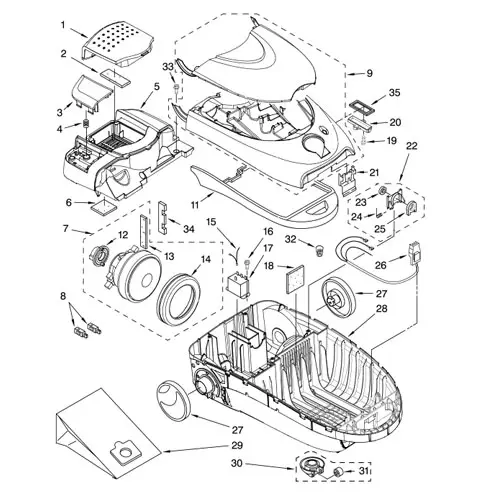
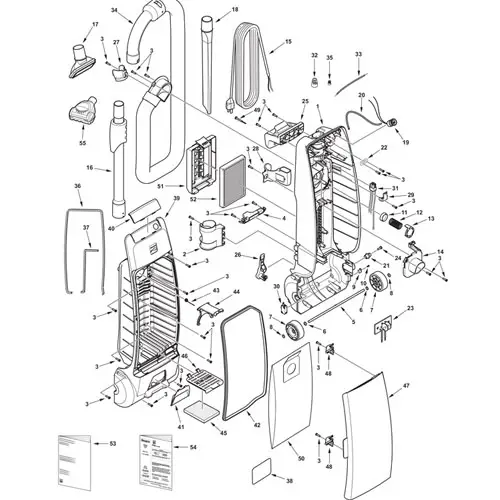
Kenmore model 116 Parts Diagram
Do it yourself- Troubleshoot Kenmore 116 at home
When it comes to electronics, they tend to act up from time to time- that’s nothing new. But while they aren’t as common, it’s necessary to repair them immediately.
In case of minor issues with your Kenmore 116 Vacuum, we’re here to lend our assistance.
Here are some recurrent concerns that regular customers face, along with their solutions that might come in handy for you!
Dysfunctional cleaner
If you come across that your cleaner isn’t running properly, these could be the possible reasons behind it-
1. The cord isn’t plugged in correctly, which restricts the electricity flow and hence results in a non-functioning cleaner. For this, simply plug in the cord a bit firmly so that the connection is stable.
2. Sometimes, you might notice a tripped circuit breaker or that your fuse is blown away. The easiest way out for this is to reset the circuit breaker or replace the fuse with a new one.
3. Often, the suction motor might get disconnected or in electrical terms, get tripped. In such cases, try checking whether the vacuum bags are full and if the nozzle or filter is clogged. If this doesn’t help the cause, allow the vacuum cleaner to cool down for half an hour and resume using it.
Vacuum action is below par
There are a bunch of likely causes behind such an issue,
1. The dirtbag or the dust tube might be clogged due to too much dirt accumulation. An easy solution is to replace the dust bag or clean the tube thoroughly.
2. Lever adjusted at the wrong height could be another reason for poor vacuuming. Make sure to check the adjustment settings before you start with your cleaning.
3. A broken belt might result in improper dirt removal or weak vacuum suction. Belt replacement is the smart move rather than fixing it.
4. Look for holes in the plastic hose, as this could be another underlying cause. If you notice such holes, replace the hose, and you’ll be good to go.
5. A dirty motor safety filter could be a probable excuse for bad vacuuming power. To get over this, simply clean the filter.
Issues with brush assembly
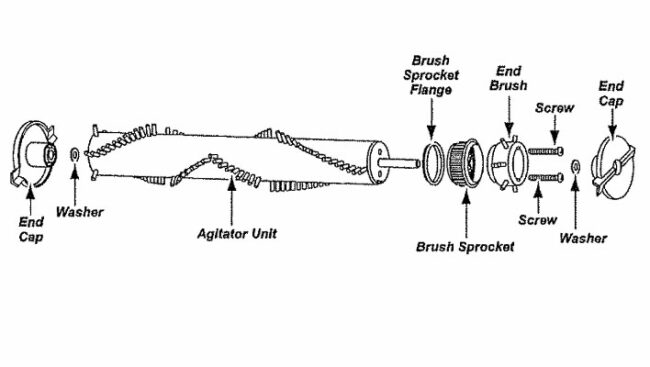
Assuming that the brush isn’t turning properly, there might be various reasoning for this including,
1. Broken belt could restrict the brush assembly from working. A replacement belt is the best solution for this.
2. If the attachment hose is improperly placed, the connection to the brush assembly is disrupted. Take off the hose and insert it firmly for a quick repair at home.
3. When your Kenmore 116 has the wrong lever setting, the brush assembly seems to act up. Just switch the lever adjustment to auto and it’s fixed without any hassle!
4. Just in case you have a connection issue with the belt protection system, make sure to check for clogs and clear it up.
Malfunctioning indicator lights
Given that you are having issues with your Kenmore 116 vacuum performance indicator, the probable causes might involve:
1. The light bulb is defective or has burned out. For fixing this, just change the light bulb, which is super easy to do at home.
2. In case the hose isn’t properly attached to the base of the vacuum, there will be an improper connection, and the bulb wouldn’t light up. Try reattaching the hose tightly to ensure a stable connection.
3. When the height adjustment lever settings aren’t correct, the bulb won’t work. Be sure to choose the right settings, and you will face no such issues.
4. A tripped belt protection system might result in the indicator bulb not lighting up. An effortless fix is to reset the system.
Cleaner is thrusting
Presuming that Kenmore vacuums owners notice a malfunctioning cleaner where the vacuum is picking up mats or shoving through too hard, the viable logic behind this could be-
1. Height adjustment lever is set to the wrong settings. To get over this issue, make sure to adjust to a higher setting which will supposedly fix the problem.
2. Whenever you face issues such as this, check the speed. Such thrusting issues are often caused when the speed is set too high.
If this is the case, immediately change the speed to LO, and you’ll be geared up for some effortless cleaning.
The indication light is red
More often than ever, users seem to face this trouble and get anxious very easily. However, the causes behind this are very easy to grasp and can be repaired in no time. These underlying problems might consist of:
1. Whenever the vacuum’s dirtbag is filled up or clogged, the indicator will turn red to alert the user. Just replace the bag with a new one!
2. Frequently, the motor safety filter can get dirty, especially if you have been doing a lot of cleaning lately.
To set the indicator light back to normal, get the filter cleaned carefully and just relax.
3. Given that the airflow passage got clogged, the indicator will turn red instantly. Unclog the vacuum airway to restore the working order.
With this troubleshooting assistance coming to an end, we have reached our finishing point.
We now hope that you are, at the least, close to becoming a Kenmore vacuum expert.
But in case you are unable to resolve any such matter regarding the vacuum cleaner’s disassembly or glitches, make sure to contact the Kenmore helpline. Meanwhile, have a good one!
Related Reads:
Shark vacuum troubleshooting guide

Hi, This is George. Founder Of Vacuumist.com. Completed my graduation in Bachelor of Business Administration. Proud father of two lovely baby girls. Reviewing home appliances is my passion. Developing this blog to update and publish my recent reviews and research. Stay in touch.